
How To Read A Star Chart
When you first start out into astronomy, learning how to read a star chart can be pretty confusing. The more you get into it however, the more it will seem like second nature!
You will be able to easily locate just what you are looking for, based on some numbers and a strange round map that looks like gobbledygook when you first start trying to read charts!
Star charts have been used for thousands of years to plot the night skies. The oldest recorded star chart is reckoned to be over 30,000 years old! Before sat nav and GPS, star charts were used to help people map the world and to know where they were travelling.
Source: Dreamstime.com
Simply by using your current location, along with the time and date, you can start to plot the positions of the stars and use this knowledge to get yourself some really good shots of stars, planets, galaxies and more.
Initially, a star chart can look pretty confusing compared to what we’re used to – but remember how hard it was to first learn to try to read a map? That’s probably pretty much second nature by now, so bear in mind when you’re struggling with your charts that all is takes is a bit of practice.
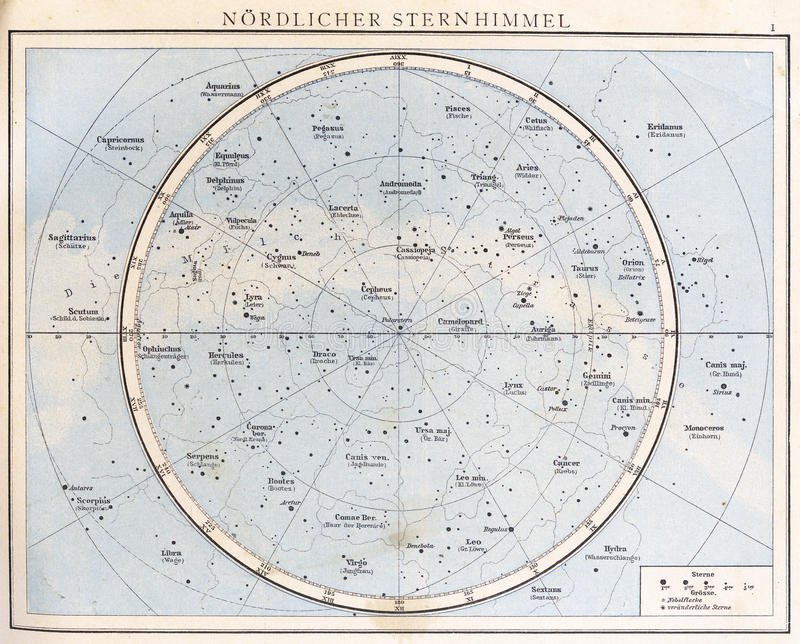
A star chart, in case you’ve never seen one, is laid out in a circle. The edge of the chart shows the horizon, while the centre shows the point directly above you, at 40 degrees North. The first thing to bear in mind is that the points for East and West are reversed if you look at the chart as you would a map, because you are meant to look at it raised above your head. Here are few further tips on how to read a star chart:
- Choose a dark night, and step outside for 10 minutes or so before you attempt the chart, to let your eyes get used to the gloom. Find the darkest place you possibly can to do this, avoiding bright lights such as shops, streetlights and heavily populated urban areas. You may also wish to begin your star chart journey on a night where there is no full moon, as the extra light can make it difficult to pinpoint individual stars.
- A red LED torch is very useful to be able to actually see your chart in the dark; you can use a normal flashlight but it is helpful to dim it so you don’t have to accustom your eyes to the dark all over again.
- Rotate the chart to whatever direction you are facing. If you are facing South, for example, turn the chart so South is at the bottom.
- Find a small section of the chart with bright, easy to locate stars (Orion or Ursa Major is a good place to start).
- One you have located your stars, try to connect them with the rest of the chart. It can take time, initially, to get used to the vagaries of chart reading, so take your time and don’t worry if you don’t “get it” straight away. Practice makes perfect!
- Take a section of the sky at a time, don’t try to map the whole thing straight away. Space, as we have learned from Douglas Adams, is “really big”! Try to familiarise yourself with a bit of it at a time, so that it is cemented in your mind and so that you don’t get discouraged.
- Bear in mind that the stars do move. If you are outside studying your chart for hours and hours, the stars will move along the ecliptic and you may suddenly find that your calculations are inaccurate. After 3 hours, the stars will have moved 1/8 of the way around the sky, and after 6 they will have moved 1/4 of the way. But let’s face it, after 6 hours you may have got cold and gone inside for a hot chocolate!
There are a great many different charts out there, and once you have grasped the basics you may feel the need to move on and try other, more complicated ones. The main thing, as with any hobby, is to enjoy it, so as long as you’re still having fun then you can continue learning how to read a star chart, and making the very most out of your stargazing journey.

